Little Miss E should be here in about 9 weeks. I am so excited!
She already has an insane amount of bows and headbands. Some inherited from Miss J, and some given to me by a friend who also bought her daughter lots of bows when she was tiny!
I wanted a cute bow keeper/holder thing, so I started with what I already had.
I had several bow holders for Miss J, so I just recovered one! It was a canvas covered in batting and fabric.
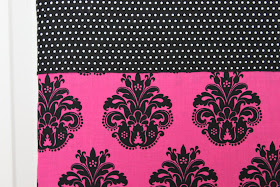
I started with these fabrics....
Since this will be hanging up in her closet, I thought I would go with a non purple color scheme. Change it up a little!
I cut my fabric a little larger than my current bow keeper, and used my glue gun to attach the fabric.
I just glued right over the old fabric.
I made sure to pull the fabric tight as I went around the frame.
On the front of the bow keeper, I just left the raw edge showing. I covered it up with my black polka dot fabric.
Then, I added the black polka dot fabric, again using my glue gun.
I love it!
Next, I added thin black ribbon, again using my glue gun. I evenly space the ribbons going horizontal and vertical.
Here's what my ribbons looked like on the back....nothing fancy, but no one will ever see it!
Here's the bow keeper with all the ribbon on it:
To jazz up the top a little, I layered a thick black ribbon with a hot pink one:
I mentioned that Miss E has quite a few headbands....I wanted to use this bow keeper for those too! I looked around Lowe's for some hooks, and found some that worked perfectly!
They are called "Ook Hooks". Fun name, right?
They are technically to be used to hang up stuff on masonry (like brick, etc), but work great for my little project.
They have little hooks in them that you hammer into whatever surface you want:
They only come in white, so I whipped out my black spray paint (for plastic).
Gave them a few good coats...
Since my bow keeper is a canvas covered in batting and fabric, that means it has a wood frame.
I lined up my hooks on the bottom of my bow keeper (on top of the wood frame) and hammered them in!
(I was worried that hammering would chip the spray paint, but it didn't)
After all 5 hooks were hammered in, it was looking good!
The finished product:
Covered in bows and headbands!


Perfect for a girl's collection of bows! It is a great way to organize and decorate too!
ReplyDeleteThose fabrics are SO cute, and the project turned out awesome! great way to keep organized :)
ReplyDeleteI'd love for you to link this up to my link party, Your Whims Wednesday! http://mygirlishwhims.blogspot.com/2011/05/your-whims-wednesday-8-and-features.html
lovely! i like how the pink fabric matches your blog background :)
ReplyDeletenice work!
ReplyDeleteCUTE!!! Love it, thanks for showing how. Thanks for linking to Quilt Story :)
ReplyDeleteI have 3 sisters that have girls that are going to LOVE this project! Thanks for sharing! I'd love for you to come link up any projects you have at DIY Thrifty Thursday @ www.thrifty101.blogspot.com
ReplyDelete~Michelle
Hi,
ReplyDeleteI am your follower. I really really like ur blog!
Keep up the good work!
Could u visit my blog too at:
http://aliascreativelife.blogspot.com/
9 weeks- how exciting! Love the little collection! We are due in under 4 weeks, Im hoping I get a chance to finish the nursery!
ReplyDeleteThis is super cute! I love the hot pink damask. I found you through Young Nester. Thanks for sharing. :)
ReplyDeletegreat project. I wish I had thought of this when my daughter was younger. I have tried so many ways of organizing her hair accesories and you idea is great.
ReplyDeleteSo cute & so many bows! :) My girls think they are two old for bows but I still think they look cute. ;) Congrats on the baby...hope everything goes well. :) Just letting you know that I started a new link party over on my blog...would love to have you link up sometime. Talk to you later. :)
ReplyDeleteGinger
I mean too old! It's late I'm going to bed! :)
ReplyDelete바카라사이트 I was extremely pleased to discover this site. I wanted to thank you for your time due to this fantastic read!!
ReplyDelete