Wednesday, May 4, 2011

Easy {boutique} Burp Cloths

Pin It
I have made many burp cloths over the years!  

This is the easiest kind for me to make for new mommies-to-be, and thought you might like my quick and easy tutorial!

(if you can sew a straight line, you can make these!)


Supplies Needed:
Fabric in two coordinating colors
Sewing machine
Scissors
Ruler
(told you this would be easy!)

Step 1.  Cut out your fabric into 11x16" rectangles.  (one of each fabric)


Step 2.  Pin RIGHT sides together.

Tip: when sewing with minky fabric, pin the heck out of it!  It will keep the fabric from moving, and will look great when done!


Step 3.  Sew all four sides, leaving a small opening to turn it right side out.


Step 4. Turn your burp cloth right side out.


Step 5. Top stitch all the way around your burp cloth, making sure to tuck in the "hole" you left for turning.


DONE!


Close up:


A few more cute burp cloths:


Tuesday, May 3, 2011

Brown Paper Packages

Pin It
Have you ever been to Brown Paper Packages?  
If not, you are missing out on a seriously cute blog!  Kierste has so many original and fun ideas. 


Want to know how to make an adorable burp cloth in five steps??
Seriously, five steps!


If you can sew a straight line, you can make these!


Check out the tutorial here!


Tuesday, April 26, 2011

Rainbow Cake {in a jar}

Pin It
I had SO much fun making this that I had to share it with ya'll!

I have never tried making cake in a mason jar before, but it totally works, and is SO cute looking!

Go here for the recipe, and I'll give you my tips to make it turn out great!


Start with some yummmmmmy looking cake batter, divided into several bowls.
(I used neon food coloring for all my colors)


Spoon in one layer at a time, filling your jar about halfway with all your colors.  Like so:


TIP: the first time I tried "layering" my batter in the jars, it was WAYYYY too runny.  Add about 2 tsp. cornstarch, and 1-2 Tbs. of flour to each bowl.  It will thicken it up, and make it much easier to "layer".


Bake at 350 for 20 minutes, and top with frosting and sprinkles when cool.

Love it!!


FYI: I used half pint mason jars.
(because I love stuff that is miniature!)

Friday, April 22, 2011

{How to} Spray Paint Furniture

Pin It
I've been promising you a "how to" post on spray painting.  

Here we go!

First off, most of the things I spray paint are small-like picture frames, random do-dahs, chandeliers etc.

 tutorial found here

chandy makeover found here


Sooo, the thought of spray painting actual furniture was a VERY scary thing for me.  


Here's what to do if you want your paint job to turn out great!

  • The brand of spray paint you use MATTERS!  I have used lots of brands, and I honestly think that Krylon is the best.  Do not buy the $1 can of spray paint.  You will wind up using 4 cans of cheap-o paint to do what 2 cans of Krylon can do.  Experience speaking!!  
 (the "no cheap-o spray paint rule" applies to ALL spray paint projects.  Not just furniture!)

  • I do not sand my furniture before priming.  I think it creates a huuuuuge mess, and if you use a good primer, it's not really a necessary step.
  • Prime your furniture before spray painting!  DO NOT SKIP THIS STEP!  I cannot emphasize enough how much it matters whether or not you prime.  If you don't prime, your spray paint will chip and look awful.
  • I have tried lots of brands of primer, and the best by FAR is Kilz.  It covers a lot with one can, and it is just awesome.  For some reason, it leaves a fine "grainy" texture on your furniture after it dries.  Use 220 grit sand paper and lightly sand your furniture after you prime.  That grainy feel comes right off, and leaves your furniture feeling smooooooth!
  •  Prime the heck out of whatever you are spray painting.  It will take a few coats, but will be worth it!  Prime until your furniture is a uniform white, with no splotchy patches.
  • After you prime, it's time to spray paint!  No matter what color you choose, the rule is the same.  Light, even coats, with plenty of drying time in between.
  • If you want to save your hands, use rubber/vinyl gloves when spraying/priming.  It is hard to get spray paint off your hands! 
(this is my favorite kind to use)

  •  After you spray paint, it's time for the final step-Polycrylic.  This seals and protects your paint job.  I've read that polyurethane will yellow over time on furniture that is painted white, so polycrylic is a better way to go. 

  • Other pros of polycrylic: it is way less odorous than polyurethane, you don't have to use mineral spirits with your brush, and it doesn't bubble.  I used the minwax brand, and I really like the results. It is easy to apply, and dries fairly quick.

  •  I highly recommend sealing your furniture; it really is a step you shouldn't skip.  It will keep your primer/paint job from chipping!
  • For those that will ask: I have tried brush painting furniture before, with latex paint, and I never get good results.  I always have brush strokes, and I just don't think it looks as professional.  I think that spray paint is usually a much better option.


Specifics on spray painting a crib


  • All of the above tips apply.  
  • I personally emailed several ladies in blogland who spray painted their cribs to ask how their spray paint job has held up.  They all said it has held up great, with no chipping, and that they wished they had done it sooner!
  • Spray painting is going to be your fastest way to give your crib a face lift.  I can't imagine trying to get in between all those slats with a brush!
  • Disassemble your crib as much as possible before spray painting.  It will make it easier to get in all the nooks and crannies.
  • To give you a reference, my crib (which is a large crib) took 6 cans of primer, and 5 cans of spray paint.

Hope these tips help, and feel free to email me with questions!
alittleofthis.alittleofthat.blog@gmail.com 


Linking up here!
and Tidy Mom


Monday, April 18, 2011

Easy Easter Snack Idea {Goldfish Carrots}

Pin It
It's Miss J's turn to bring snack for her preschool again.  She and I wanted to jazz up snack time a little....she loves bringing a "fancy snack" to school.


I don't know how fancy these snacks are, but they sure turned out cute!

Rather than load them up on sugar (which I'm sure they will get enough of this weekend for Easter!), I wanted something less sugary.  

I saw a great idea on No Fuss Fabulous.....

Can you ever beat goldfish?  What three year old doesn't love 'em?


How to make goldfish "carrots"

  • Take a disposable decorating bag (the kind you put frosting in), and fill it about halfway with goldfish.
  • Gather the top and tie with green ribbon.
  • Done!

Totally cute, right?  

And, they take all of 5 minutes to make!

Thursday, April 14, 2011

Nursery Reveal: Part 2

Pin It
I showed you my crib transformation in Part 1 of my nursery reveal.


Ready for Part 2?


I had a dresser that was in great shape. The only problem was that it was the same icky honey oak color as my crib. 

It had to go!


I started with this:


After a lot of primer, spray paint, and polyacrylic, this is what I have now!


I replaced these knobs:


With these beeeeeeeee-utiful amethyst colored crystal knobs:


So girlie.  I love it!


Now all that is left is to show you the rest of the room!

Tuesday, April 12, 2011

Sports Birthday + {FREE Printables!}

Pin It
My little man is 2!


He had a GREAT birthday party!  Lots of his little friends were there, and he seemed to be really happy the whole time.


Highlights of the party

FOOD


The Cake!


Drinks


GAMES!

Bowling


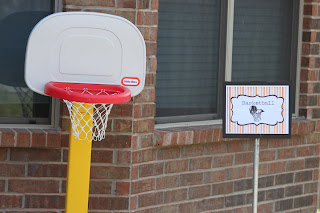
Basketball


Tee Ball


and of course....

PRIZES!


GUEST FAVORS


And now, would you like the FREE PRINTABLES for all of this??

I designed this myself in Photoshop, so please use it for personal use only!


Game Signs:

Basketball (click here)
Bowling (click here)
 Tee Ball (click here)

Guest Favor Tags (click here)

Food Labels