Wednesday, February 10, 2010

Featured at DIY Show Off!

Pin It
Check out my feature on The DIY Show Off. It's got lots of great ideas-seriously, tons!

http://thediyshowoff.blogspot.com/

Friday, February 5, 2010

Thrift Store Frame turned Burlap Beauty!

Pin It

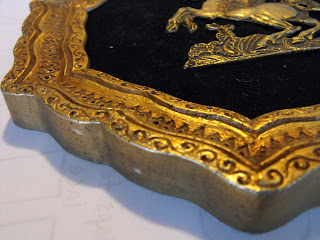
I found the coolest frame at goodwill a few weeks back:


I LOVE the details on the frame! So neat! I was not in love with the weird, goldish winged horse. I mean really....ugly!

I've been trying to figure out what do with it. Then it hit me. Of course! Spray Paint!

So, I gave it a good coat of black spray paint.

I have had some burlap that I have been wanting to do something with, so I thought that would make a good "background".

I took the back off the frame, and used it as a guide to cut my burlap. I then cut outside the line I drew, to give myself enough burlap to go over the edges. You want some extra fabric, so that it fits nice and tight in the frame.


I think it looks good so far:

Next, what should go inside? I have thought about it way too much! I have some extra damask fabric ( I LOVE DAMASK!) from doing my kitchen curtains. So, I carefully cut out a little damask swirly thing.

I gave the damask cut out a quick spray of spray on adhesive (I use 3M), and then positioned it inside the frame.

Here it is!

Tuesday, February 2, 2010

Featured at Someday Crafts!

Pin It Head over to Michelle's website to my feature! She has great ideas!


http://somedaycrafts.blogspot.com/

Saturday, January 30, 2010

Quiet Book Part 2

Pin It Here are the COMPLETED pages!


First, I want to share some tips and tricks about making a quiet book. I posted some of them here in my first post.
  • Reinforce your pages with iron-on interfacing. It will make it SOOOOO much easier to sew the felt on to.
  • Using felt for all the pieces prevents the pieces from fraying. Felt doesn't fray, so you don't have to worry about the raw edge when sewing.
  • I found that using felt for my actual pages (and sewing on felt pieces) didn't really look that good. That's why I went with fabric reinforced with interfacing. Looks much better!
  • If you are going to spend the time making a quiet book, spend the time to make it look finished :)
  • Any piece of the quiet book that is meant to bepulled off should be two pieces of felt sewn together. This will make the piece sturdier, and it won't lose it's shape as it is pulled on a lot. I mean, my 2 year isn't going to be gentle with this!
  • Sew the POKEY side of the velcro on to the pieces meant to be pulled off.
  • Sew the SOFT side of the velcro on the actual page. If you sew on the POKEY side to the page, it will catch on the pages.
  • If you are sewing two pieces of felt together (for example, two 'tomatoes'), sew on the velcro first (pokey side) to ONE piece, and then sew the pieces together. (This will look more finished) If you sew the pieces together first, and then sew on the velcro, you will see where the velcro was sewn on.


Here are instructions for my second set of pages, with templates. Feel free to use them! (First four pages can be found here)


Build a Burger Page


  1. Cut out all pieces (1 of bun top/bottom, 2 each of remaining pieces)
  2. Lay out pieces on fabric, and pin where the bun top and bottom go.
  3. Sew on bun top and bottom
  4. Attach velcro to one set of the 'toppings' (cheese, tomatoes, lettuce, patty)
  5. Sew velcro pieces to remaining toppings pieces. This will give you a sturdier object to be pulled on by little fingers!
  6. Lay toppings pieces on fabric, and mark with small dots where the soft side of the velcro should go
  7. Sew on soft side of vecro
Let's Go Fishing


  1. Cut out 1 fish bowl from clear vinyl. (This can be bought by the yard at any fabric store. It's very cheap too. Around $2 for a whole yard! You only need about 10 inches.)
  2. Cut out 1 grass, and 1 water. (for the bottom of the bowl)
  3. Cut out 2 of how many fish you want.
  4. For example, if you want 3 fish, cut out six pieces
  5. Lay your fish bowl on the fabric, and position your grass and water UNDERNEATH the vinyl. Pin where your grass and water should go, and then remove the vinyl.
  6. Sew on the grass and water.
  7. Lay the vinyl fish bowl back on top of the grass and water, and sew on the fishbowl. Leave and opening at the top to put your fish in.
  8. Sew together two of each fish (no velcro for this page)
  9. Put your fish in your bowl!


Pretty Princess Page

  1. Cut out 1 Crown
  2. Cut out 2 of each star (3 stars means cut out 6)
  3. Position crown on fabric, and sew it on
  4. Sew velcro (pokey side) to 3 of the stars
  5. Sew one velcro star to one non-velcro star (do this for all 3)
  6. Sew one piece of soft velcro to each tip of the crown (there are 7 tips)
  7. Hot glue the pokey side of the velcro to 7 gemstones (can be found in any craft store)
  8. I also hot glued a gemstone to the middle of each star
  9. Position stars where you want them on the page, and then mark where the soft side of the velcro should be sewn on.
  10. Sew the 'soft' velcro on to the page
  11. Attach stars and gemstones.
Create a Face Page

  1. Cut out 1 hair piece
  2. Cut out one face (no template, just cut a circle!)
  3. Cut out 1 set of eyebrows
  4. Cut out 2 of all remaining pieces (eyes, noses, mouths)
  5. Position hair on page, and sew it on!
  6. Sew on face.
  7. Sew on eyebrows.
  8. Note on the eyes: I layered my eys to make them look more real. I started with a large white piece on the bottom, followed by a color piece (blue for one set, brown for the other) and a small black piece on top. You don't have to do this; you could just do one color.
  9. Sew pokey side of velcro to one side of each remaning piece.
  10. Sew velcro-ed piece to corresponding non-velcroed piece.
  11. Position pieces on face, and mark where soft side of velcro should go
  12. Sew soft side of velcro onto face for eyes nose and mouth
  13. Sew one long strip of velcro across bottom of page to store pieces on (soft side of velcro)

Tie Your Shoe page


  1. Cut out 1 of each shoe piece.
  2. Sew on largest shoe piece first.
  3. Sew on next piece of shoe (purple in my picture)
  4. Sew on front of shoe
  5. Sew on foot hole.
  6. Using a handheld grommet machine, punch grommets in the flaps to lace (I did three on each side)
  7. If you don't have a grommet machine, you could just cut holes in the felt
  8. Sew on the lacing flaps.
  9. Add shoe lace.

Stoplight page

  1. Template for car is above.
  2. I did not include a template for the black traffic light or for the red/yellow/green lights. They are fairly easy shapes to just cut out :)
  3. Cut out 1 traffic light
  4. Cut out 2 of the red/yellow/green lights.
  5. Cut out 1 car body and window
  6. Cut out 2 of each wheel.
  7. Sew on black traffic light.
  8. Position car body, and sew on.
  9. Sew on car windows.
  10. Sew on pokey side of velcro to 1 of the red/yellow/green lights and to 2 of the wheels.
  11. Sew the velcro pieces to the corresponding non velcro-ed pieces.
  12. Lay the car wheels on the page, and mark where the soft side of the velcro should be sewn on.
  13. Sew on the soft vecro for car wheels.
  14. Lay the red/yellow/green lights on the page, and mark where the soft side of the velcro should be sewn on.
  15. Sew on the soft vecro for the lights.


Sneak Peak of the fabric I am using for the front and back cover. LOVE IT! My next post will be how to finish your quiet book, and do title work. Feel free to contact me ANY time with questions!


Happy Sewing!

Featured at UCreate

Pin It Kari over at UCreate is featuring my blog today! I'm so excited! She has AMAZING ideas from all over blogland. Seriously, if you are looking for a fun project, go check her out!

U Create

Thursday, January 28, 2010

Quiet Book Part 1

Pin It Quiet Book Time!!
I have finally started working on a quiet book for Miss J. It has been on my to-do list for a loooong time. It is taking longer to finish than I planned, so I am going to post about it parts, until it is finished! I know that this will be so great to have for Dr. Office visits, car trips, and church. Here are some great resources for making quiet books, and to get ideas.

Crafty Chicc

Homemade by Jill

Naptime Journal

Quiet Time Template


Supplies Needed:
(My quiet book pages are 12x12, to give you an idea of how much stuff you'll need)
White Fabric (2 yards)
Fusible Interfacing (2.5 yards)
Felt in assorted colors
Sewing machine

First, prepare your pages. I cut out 10 squares of 12x12 fabric. I also cut out 10 squares of 12x12 fusible interfacing. Fuse the interfacing to your fabric with an iron. There are instructions included with the interfacing, and most will tell you to set your iron to 'cotton' setting. Follow the manufacturers instructions to tell you how long to press the iron to the interfacing (make sense??). The interfacing will make your pages sturdy, and will make it easier to sew on the felt pieces.

Mailbox Page:
Template can be found here
  1. Cut out felt pieces.
  2. Sew mailbox post on first
  3. Next Sew on grass
  4. Attach red flag to mailbox (I used a snap, you can use a button also)
  5. Sew on mailbox part itself, leaving the inside curve OPEN so the letter can fit in
  6. Sew on flap, only at the bottom, so it will open
  7. Sew felt 'stamp' on letter

Cupcake Page:


Template is here:
  1. Cut out background fabric. I chose shiny fabric to resemble a cookie sheet.
  2. Sew on background fabric to prepared page
  3. Cut out cupcake tops (2 of each color)
  4. Cut out cupcake bottoms (1 of each)
  5. Sew bottoms onto prepared
    page
  6. Attach sequins to 1 set of the tops
  7. Attach velcro to backs of other set of cupcake tops
  8. Sew top pieces together (one has velcro on it, one has sequins)
  9. This will make your pieces sturdier
  10. Sew opposite side of velcro to prepared page, and attach cupcake tops

Gumball Machine Page
Template is above
  1. Cut out felt pieces
  2. I did not include a pattern for the gumballs themselves, it's just a circle (Cut out 2 of each circle)
  3. Sew on round part of gumball machine FIRST
  4. Sew on red bottom piece next
  5. Sew on black door
  6. Sew on gray money slot
  7. Sew on ONE of each color gumball
  8. Attach velcro (pokey side!) to the backs of remaining gumballs
  9. Attach gumballs to matching colors


Tree page:
I made my own template, but a good one can be found here

(To make your own template, just free hand draw it, and use that as a pattern to cut out; easier than it sounds. Just try it!)

  1. Cut out felt pieces
  2. Sew on grass first
  3. Sew on tree trunk next
  4. Sew on leaves (or just a big cutout of the top of a tree, like I did)
  5. Attach velcro (soft side) to tree where you want the apples to be
  6. Attach velcro (pokey side) to apples
  7. Attach to tree!

Monday, January 25, 2010

Twine Wrapped Letters

Pin It


I love twine. It's my new best friend! I'm going to wrap everything in twine (no, not really!). I saw this idea on Shanty 2 Chic, and thought it was cute!

Supplies needed:
Wooden letters (I chose 'S' for my last name)
Glue gun

  1. Start by wrapping the twine at one end of the letter, hot gluing every so often
  2. Keep wrapping the letter, making sure to double wrap some areas to completely cover
  3. That's it!
  4.