Tuesday, March 30, 2010

PVC Pipe Curtain Rods PART 2

Pin It


I have had so many amazing comments on my PVC Curtain Rod post. Thank You so much! They really mean a lot to me! I had some really great questions, and some good feedback I want to share to make this a project YOU can do!

1. I bought my finials, wall sconces and brackets at Lowes. They were reasonable priced. HOWEVER, I found unfinished wood finials back in the fencing/lumber section for a 1/3 of the cost after I had already finished my project. Check them out if you are thinking of doing this
project.

2. I hot glued my finials in place. This does make it more difficult to take down the rod and remove the curtains, but honestly, there is no reason to remove the curtains. Most drapery fabric is "dry clean only", so unless something really drastic happens to your curtains, you won't be taking them down.

3. I spray painted my PVC pipe with regular spray paint. It did scratch when I installed the
rods (not too badly), and I wound up doing several "touch ups". A reader clued me in and let me know that they make a special spray paint just for plastic. DUH! Why didn't I think to look for that?? It takes about a week to cure, but when cured, it doesn't scratch.

**I got another fantastic comment, telling me that plastic primer is even better. Using plastic primer, you can use whatever color you want! Plastic spray paint comes in limited colors.**


4. For my corner windows, I used a 90 degree connector. The amazing thing about PVC pipe is
that there are a milllllion kinds of connectors. Just go to the plumbing section; you'll see a
connector for any kind of angle. This project would even work on bay windows!

5. I would love to see your finished projects! I'm interested to see how this works for you!
Wednesday, March 24, 2010

Retro Rocking Chair Re-Do

Pin It
I am so happy to share my recent furniture re-do with all you guys! I have had so much fun breathing some new life into this VERY retro rocking chair!

Here she is in all her glory!!
Where did I find this lovely?? Canton, TX of course. The best outdoor flea market ever.

How much did I pay? $40. Not back considering the potential this chair had! (potential I saw, and the hubby did not. He was like...."ewww". But, he DID let me buy it!)

I LOVE THE LEGS on this chair. It's what first caught my eye!


DO NOT be scared to re-upholster something! It's a "figure it out as you go" kind of thing. Every piece of furniture is different. Just take it apart, and go for it!

First, I removed the seat cushion. It was simply screwed in on the bottom. Remove the screws, and then pull out the cushion.I had to have my hubby remove the seat back. Quite a bit of pulling and yanking was required.
I then lightly sanded the whole chair, with circular sander thingy (I know nothing about tools obviously....)
Sprayed it with some primer. (sanding and priming are optional, but make it look so much more finished!)

I then gave the chair a few coats of Krylon Black Satin (forgot to take a pic. sorry!)


Next I re-upholstered the seat cushion.
Here are the EASY steps to do this.
  • Lay fabric on the floor, wrong side of fabric up.
  • Center seat cushion on the fabric
  • Using a staple gun, staple one edge of the fabric
  • Go to opposite side of cushion and pull the fabric TIGHT and staple that side (ex: if you staple the left side of the cushion first, do the right side next)
  • Finish stapling remaining 2 sides, making sure fabric is tight the whole time
  • When you get to the corners, make sure you neatly fold the fabric
(kind of like wrapping a present)


I then tackled the padded seat back. There is really no right or wrong way to do it I discovered.

Here's what I did:
  • I re-covered the existing seat back using the same steps as above
  • I made my own cording to go around the edge of the seat back using cord
    (can buy at any craft store) and leftover fabric from this project.
  • I stapled in the cording all around the seat back opening
  • I then stapled the backing right below the cording (this chair has an open back, so you can see the fabric)
  • Next, I stapled the seat back cushion in place.
  • I rolled the lining up over the seat back and hot glued it down to hide all the staples (all 4 sides)


Here is the finished product!


Isn't it BEAUTIFUL?

(I made the little throw pillow too)

Close up of the fabric (that matches my master bedroom bedding PERFECTLY!!)


I'm in love....................

Just another BEFORE

AFTER

I'm linking up over @ A Soft Place to Land and Shabby Chic Cottage and Finding Fabulous and Shanty 2 Chic and TidyMom


Tuesday, March 23, 2010

DIY Topiary

Pin It
Thank you for all your AWESOME comments about my PVC pipe curtain rods! I will be posting (hopefully tomorrow....) a Part Two with tips, tricks, and general help for making your own PVC Curtain Rods. I have had a ton of e-mails and great comments from readers that I will be including. Thanks for all your comments!


I saw a great tutorial for DIY topiaries a few weeks ago at Living with Lindsay. She had a great suggestion of looking for a topiary at a thrift store that just needed a makeover. Cheaper than buying all the supplies for a new one.

So, I kept my eyes peeled for a topiary that needed a makeover as I went thrifting. I found one! This little gem was so sad looking. Definitely in need of some love. And, for $2, that's my kind of price! Look at that hideous fake fruit. I guess that was in style at some point, right?


I started by pulling off all the fruit....it left a lovely "old glue" mess!


Yep, the grass had to go too. I started to wonder if this topiary was worth saving.....


Here it is. Looking a little....well, naked!


I then followed Lindsay's instructions, which are found here. Go check out this tutorial, it's great!

I spray painted the gold pot black (duh!).


I couldn't decide what to do about the grass. I'm not a huge fan of fake moss. So, I cut up some twine, and hot glued it into the pot.


I added a twine ribbon, and there you go.


Go find a topiary to rescue!


Wednesday, March 17, 2010

Framed Vintage Silverware

Pin It


I have a frame addiction. If you have read my blog, you have already seen me transform and/or frame things here, here, and here.

I found some great vintage silverware in Canton. I knew I wanted to frame them for my kitchen. I loved how old they look....


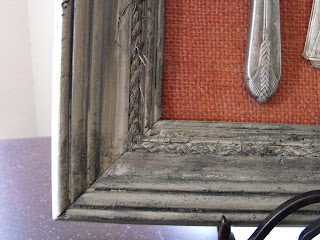
I went to Goodwill and found yet another frame that needed to be rescued! Love the artwork....


I spray painted it Valspar Urban beige, and using my own glaze (find out how you can make your own glaze in this project) distressed it a little. I then added some burlap for the background. Now, I thought the burlap made it look a little washed out, so I spray painted the burlap too. I used Krylon Georgia Clay (the red would go well in my kitchen).Here's what it looks like.


I hot glued on the silverware, and voila! Framed silverware for the kitchen.
(sorry for the weird light in this one....my camera is acting up) Love the interesting details!
Total cost:
Silverware = 75 cents
Burlap = free (already had on hand)
Frame = $1.99 at Goodwill
Spraypaint = free (leftover from other projects)


I promise that my next post will not involve a frame :D

I'm linking up over at Room to Inspire and Get your Craft on
and The Shabby Nest 
and Sumo's Sweet Stuff

Monday, March 15, 2010

Framed Skeleton Keys

Pin It
I have been seeing a lot of keys lately. Everywhere.
These sweet keys are from Pottery Barn....of course :)


This framed art version is from Restoration Hardware, and is $199.00. Yes, you read that right. Ouch!


This wall art is pretty cute, and I love the little pillow.


So, I've been on the lookout for some old skeleton keys. We went to Canton, TX last month for their annual Trade Days, and it was awesome! They claim to be the largest flea market in the country. In the month of May, they have around 15,000 vendors and about 200,000 people come to shop. I was shocked by the amount of 'treasure' I found! If you want to find junk to re-do or decorate with, Canton is the place to go!


Anyway, I found lots of skeleton keys on our trip, and have been looking for a frame for them. I found a cute one at Goodwill today. It was in pretty good shape, and already a chocolate-y brown color.

I added some burlap for the background (you know me....) and hot glued on my keys and key hole. Think it turned out good? Now I have to find juuust the right place for it!


I'm linking up at Get Your Craft on!