Monday, September 27, 2010

PVC Pipe Curtain Rods {AGAIN}

Pin It
I showed you in this post and this post how to use PVC Pipe to make cheap and awesome curtain rods!


Well, I did it again!  Miss J's room has been in need of some new window treatments for a while.  A very plain window...


First, I found some fabric that I really liked. I made two simple panels, long enough for Miss J's tall windows.  (even if you are a sewing newbie, curtains are very easy!!) I was going for simple and kind of Pottery Barn-ish.


 Next, I got some PVC Pipe, and cut it to size.  I then primed it and spray painted it.  I used primer made especially for plastic to prevent scratching.


Next, I primed and spray painted some ugly finials I had laying around.  Ewww.


They looked muuuuuuch better after some paint!


After I put up the white brackets I bought, I attached my finials.  I just use hot glue.  It's strong enough to hold it on, and will pop off easily if I ever need to take it down.  It's a win win!

I did not like the fact that you could see the hot glue.....


So, I added a thin piece of ribbon to hide it!


Here are some finished shots:


Before:


After:


Project Cost:

Primer/Spray Paint:  Free (already had both)
Finials: Free (leftover from previous project)
PVC Pipe: $1.38
Wood Brackets: $9

Total Cost: $10.38
If I could figure out how to go cheaper on the brackets, this project could cost basically nothing!


As always, email me with any questions you might have!
alittleofthis.alittleofthat.blog@gmail.com

Sunday, September 26, 2010

Giveaway Winner and DISCOUNT code!

Pin It
I'm happy to announce the 2 winners of the Say it on the Wall giveaway!


Winner #1 is..........

ROBERT and CASSIE!

(this is not the 16th comment, because a few of you didn't leave separate comments for each entry.  I was trying to still be fair and count each entry.  This winner is the 16th entry.  Does that make sense??)


Winner #2 is................


The Hunter Family!

Please contact me ASAP to claim your gift certificate!


For those that didn't win, you can still get THESE labels for 40% off!


That means you will only pay $1.50 per label. 
 
That is a STEAL y'all!

Just enter   THISTHAT40   at checkout for your discount!!

Head over to Say it on the Wall and get your 40% off kitchen labels!

Wednesday, September 22, 2010

Pacifier Corsage

Pin It
I have a quick and easy craft to share with you today!

I recently helped host a baby shower, and wanted the mom-to-be to have a cute corsage to wear!


Supplies Needed:

Gerber Daisy flower (in multiple colors if you are doing a multi-toned corsage)
Glue Gun
Pacifier
Safety Pin
Ribbon (Optional)


Step 1

Take apart your flower by removing the middle and seperating the petals.


Step 2

If making a multi-toned flower, repeat step 1 for the other color(s)


Step3

"Stack" the petals starting with the largest, alternating colors and using hot glue in between each petal.


Step 4

Hot glue the safety pin to the back of the corsage.


Step 5

Hot glue the pacifier to the front (you could use double sided tape if you want the pacifier to be re-usable).


Step 6

Add a little ribbon if you like!


Simple, easy, and cute!


Thursday, September 16, 2010

Say it on the Wall Giveaway!

Pin It
I'm super happy to do a giveaway with Say it on the Wall!  

This is an awesome vinyl company!  There are so many fun products to order!


You might remember my awesome jar labels from this post

I ordered them from Say it on the Wall!


Some of their products I really like are:

How cute is that?  I love the different color letters!


I'm a sucker for glass blocks.  I think they are so pretty, especially all lit up!


I think this one is just a nifty idea.  An eraseable calendar!  Just use an old 16x20 frame to create this fun project.


Now, on to the how to win!

 We will be giving away {2} $20 Gift Certificates.  

Awesome!  2 Winners!
Here are the rules:

(1) Become a Say it on the Wall fan on Facebook  (Mandatory Entry) - leave a comment telling me!
(2) Become a follower of A Little of This, a Little of That - leave a comment so I know you follow, or that you are already a follower!
(3) Subscribe to A Little of This, a Little of That (located on right side bar) - leave a comment telling me you subscribe!
(4) Become a follower of Say it on the Wall's blog! Click Here - leave a comment so I know you follow!
(5) Visit Say it on the Wall and tell me what you would buy if you won! - leave a comment telling me what you would get!
(6) Vote in the Custom Design Promotion over at Say it on the Wall - leave a comment telling me you voted!


That's six ways to win!  Good Luck!!

Friday, September 10, 2010

Pretty Pantry {A Makeover Story}

Pin It
One of the reasons we bought our house was because of the enormous walk in pantry.   
It can hold SO much food!


  I've periodically organized it, and then my sweet husband, who loves to cook, would un-organize it for me.  On a daily basis.  I mean, I love when he cooks, but the pantry was getting out of control!  Let me show you with some pictures. (EMBARASSING!)


Lots of shelf space, lots of storage.  My pantry was not being well utilized!

{click to enlarge if you want to further gawk at my messy pantry!}


Also, our pantry has tons of room up top, and we could easily add another shelf for storage.


I really dislike having no color on the walls.  
Off to Lowe's I happily went to buy lumber, and some paint!


Here's a quick run down of what I did to transform and organize my pantry:

* Take everything out of pantry (for a fresh start)

* Install new upper shelf

* Re-paint all shelves (Valspar Arctic White-semi gloss finish)

* Paint walls of pantry (Valspar Butterfly Bush-satin finish)


Here is a finished shot:


I'll show you the different "areas" of my new and much improved pantry
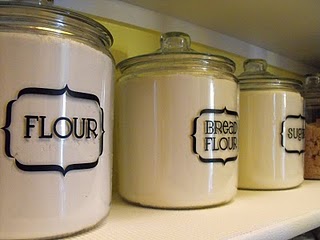
Baking Center:


Glass Jars from Walmart, vinyl labels from Say it on the Wall.
I LOOOOOVE my glass jars.  They are my *favorite* part of my new pantry.


Wicker Baskets from Target.  
They have been AWESOME for holding all my baking stuff.


Spices:


I order my spices in bulk from San Francisco Herb Company.  I bought mason jars, and labeled all my spices (with dates).  It has been GREAT!  I never run out of anything :)


We cook.  ALOT.  So, we have about every spice or seasoning known to man.


Snack Center:

This was purposely put on a high up shelf, out of reach of my little ones.  
Sorry Miss J and Mr. A!


Basket from Walmart.


Container from Tupperware.


Large Glass Jars from Walmart and Goodwill.  

Having the fruit snacks in a jar saves my pantry from having a lot of this crowding the shelves:


Canned and Dry Goods:


Notice that you can SEE all my canned goods.  

I made simple "risers" out of some 2x4's I had laying around.  
I stacked three 2x4's to raise up the very back row.  
For the middle row, I stacked two 2x4's.  
The front row sits on the shelf.  

A CHEAP and EASY solution for canned goods.


I LOVE keeping my pasta in these containers. 
(they are from walmart, and are supposed to be for cereal).  

You'll notice the container on the left has spaghetti in it.  I saw this genius idea on someone else's blog.  I can't tell you how many times my spaghetti has spilled all over the floor.  The box would never stay closed!  Not anymore!


Rice and Beans in their own containers (all from walmart) and awaiting their turned to be properly labeled :D


Here is a Final

 BEFORE


AFTER


Tips for organizing YOUR space:

  • Take everything out of your pantry/cabinets, and start fresh.
  • Have all labels on cans, bottles, etc face outward.  It looks clean and organized.
  • Get can risers (or MAKE them) for canned goods.  It makes a huge difference!
  • LABEL everything.  Even if you think it's silly, it will help you stay organized.
  • Buy baskets to put the pesky stuff in.  I used baskets for all my baking odds and ends (vanilla, baking powder/baking soda, food coloring, chocolate chips)
  • Paint can do wonders.  It really brightened up my space.
  • Be consistent in putting stuff back where it goes!
  •  
     Other GREAT pantry projects to check out!!