I never know what is going to inspire my next DIY project.
I was strolling through Target this week (best store ever!), and saw the cutest tiered stands.
It got me thinking.....could I make one myself??
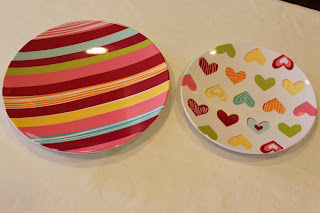
So, I picked up these two adorable plates:
Aren't they SO cute?!
I'll give you a Sneak Peak at the finished product:
Supplies for a {Chic} Tiered Stand
Melamine plates (one large, one small)
Threaded Rod (found at Lowe's on hardware aisle)
4 Nuts (that fit your threaded rod)
Bic Pens
Drill
Measuring tape
Spray paint
"Topper" for your stand (I just used ribbon)
Step 1
Disassemble your bic pens, like so:
Step 2
Spray paint the body of your pen (the WHITE part) a color that will coordinate with your plates.
I choose Ballet Slipper, a very girlie pink, since I am making a Valentine's Day tiered tray.
(Just in case you were wondering, you will be using the "pens" to cover up the threaded rod)
Step 3
Measure your plates to find the EXACT center. Mark with a pen.
Step 4
Place your plate on a wooden block (or surface you don't mind drilling in to), and drill a hole in your plate at the spot you marked.
TIP: Push down gently, and BE PATIENT as you drill your hole. If you apply TOO MUCH pressure, your plate will crack.
If you are unsure about how much pressure to use, try drilling on a "practice plate".
Your plates should now have nice holes like this:
Step 5
Take your threaded rod, and push it gently into your bottom plate.
On the bottom of your large plate, put on a nut, and make it level with the bottom of your plate. Like this:
Step 6
Slide on one of your spray painted "pens", and top with another nut.
Step 7
Gently slide on your smaller plate, and top that with a nut, and then a spray painted "pen".
Step 8
Top your spray painted "pen" with another nut.
(optional step: if you feel the top of your rod is too large to cover up, you can cut of a little with a hack saw-if you don't have one, they cost about $4 at Lowe's.)
Step 9
Time to cover up the top of your tiered stand! I used some matching ribbon, and called it good!
Step 10
Pile high with goodies, and enjoy!
Total Cost:
Melamine Plates: $3.50
Threaded Rod: $.97
Nuts: $1
Bic Pens: free; already had some!
Spray paint: free; leftover from other projects
Ribbon: free; leftover from other projects


I love this! I have been wanting to make one of these, but it so cute I want to make one I can keep out all year round. I need to go on the hunt for some damask plates I think. Great job! I'm going to link up if you don't mind!
ReplyDeleteThis is so adorable! Totally adding to my list of things I want to make! Thanks a ton for sharing!
ReplyDeleteHope you have a blessed day! :D
This is really cute and very inexpensive! I love your blog I am a new follower! I would love it if you followed my blog http://breakingfreefromoldways.blogspot.com
ReplyDeleteSuch a cute idea!!! Love it!
ReplyDeleteSara without an H, hehe
Extra cute-what a creative idea-love it!!
ReplyDeleteLove love love it!!
ReplyDeleteI totally just made a similar one! I used the cake pillars from Joannes though. I love it!!
ReplyDeleteSo cute! I am wondering, how do it sit with the nut on the bottom? Did you have to do something to make it stand? I am dying to make this now. :) Lisa~
ReplyDeleteVery cute! I had the same question as Lisa, about the nut on the bottom. It seems like that would make it teeter back and forth. No?
ReplyDeleteHey Lisa and Lacey!
ReplyDeleteAs for the nut on the bottom, no it doesn't make the plate wobble. The plates I got from Target have a ridge around the bottom of them. The nut is fairly thin, and does not stick out past the ridge on the bottom of the plate. Does that make sense? If you go to Target and take a look at these plates, I think you'll see what I mean. Hope this helps!
Sarah
this is so cute! i love these types of stands!
ReplyDeletehttp://inthehammockvintage.blogspot.com
This is SO adorable! I have tried this unsuccessfully in the past... The melamine cracked even without ANY pressure. I even turned it over onto a square of wood so the outside edge wasnt being pushed on... I purchased 8 plates in total and cracked 7 of them, lol. It might have been the color set I chose, but I was very disapointed!
ReplyDeleteYours in STINKING adorable!
Thanks for linking up to Making It With Allie! I can't wait to see what you have for next week!
AllieMakes.Blogspot.com
This is adorable! I LOVE Target too. I could seriously lose myself in there for hours dreaming of would be projects!
ReplyDeleteIt looks darling! Good job!
ReplyDeleteI love this AND the cost!!!
ReplyDeleteGreat idea and so cute. I like that you could disassemble and reuse the rod and nuts to make other holiday stands or just to store it easier.
ReplyDeleteI loved your idea so much, I featured it at Sassy Sites for my "Saturday Shoutouts". Thanks for linking it up to our FFA Friday link party! Happy Saturday! xoxo!!
ReplyDeleteI love how you did this! You are so amazing! I am going to have to try this out! I would love to have you link up to Fantastic Friday at http://ironvioletdesigns.blogspot.com
ReplyDeleteThanks for the tutorial!
OMGosh, this is waaaaay cute Ÿ These plates are everywhere and they have them for every holiday. I can see several of these towers in my future. Thanks so much for the great tut. Pics always help Ü
ReplyDeleteThis is so cute!! I want to make one! I just found your blog from Thrifty Decor Chick. Congrats on being a guest post on her blog thats awesome!! :) I am now your newest follower. Come check me out if you get a chance.
ReplyDeletehttp://noplacelikehomecraftsdecorbyallyson.blogspot.com/
~Allyson~
Cute!! Just found you through TDC. Totally darling -- and I wonder if you could screw little lamp topping finial would onto the top too?? I might have to try this (and I struggle in the crafty department so that's a big compliment, teehee!)
ReplyDeleteSO cute! Great tutorial! Found you over at TDC!
ReplyDeleteFirst of all, this is a fabulous idea! I wanted a tiered stand like this, but can't find one I'm willing to spend that much money on. They can be expensive!! I love this, cant wait to try it out! I'm your newest follower, found you through TDC.
ReplyDeleteHi Sarah! I hopped over from TDC today and your blog is super cute! I too am from a small town in Texas (although I currently reside in Louisiana) but I'm sure you know what it feels like to call Texas home. When you said "all I can say is Texas rocks"... I sensed a kindred spirit! Loved the tutorial - and I am now a follower! Have a great day! :)
ReplyDeletevery cute idea!! I have loved those plates since Target first got them in but have not bought any. Yet. That stuff doesn't usually sell out at the little Target closest to our house so a lot of it ends up going on clearance so I always try to wait it out.
ReplyDeleteI found your blog from TDC!! This is such a clever idea!! I am for sure going to have to try this.
ReplyDeletesaw you on Thrifty Decor Chick today (I am also one of the newbies) and I have seen your post on other link parties! I am glad to stop by and see your page! Great project! I am also a Texas native (now in Alabama) - Texas does rock! :)
ReplyDeletePS - I am your 1000th follower - wahoo! :)
ReplyDeleteStopping over from TDC, and I'm so in love with this project! I just bought this super ugly cupcake stand for more than the $5.50 you spent on this beauty! Now you've got me all inspired :) Great blog!
ReplyDeleteThis is such a cute idea! I love it! And you use Krylon too. A girl after my own heart! Its so nice to meet you! Thanks for visiting my blog! :)
ReplyDeleteHey Sarah! Thanks for being my newest follower, I'm yours now too. :) I saw your blog feature on Thrifty Decor Chick yesterday too..pretty neat we both got on..how fun!
ReplyDeleteI adore your plate tutorial..so colorful and looks easy! I've been wanting to do one of these for a while, but I have porcelain plates and will need a different drill bit. (but the idea to use the pen covers is genius!)
Glad you liked my chandy makeover, I absolutely LOVE it! It makes me smile every time I walk into my kitchen! :)
Have a great day and can't wait to see what else you do in the future! (I'll be looking at some of your older posts a little later!)
Missy
Love this idea (and how cheap it was!) Found you from TDC! :)
ReplyDeleteHow adorable! Love it!
ReplyDeleteI absolutely LOVE this! This is definitely one of the cutest tiered stands out there. I'm running to Target right now to get these plates!
ReplyDeleteJessica @ http://myworldmadebyhand.blogspot.com/
WOW, what a great idea, love this now I know what I can use those extra plates for. This would also be a great hostess gift for any holiday. New follower
ReplyDeleteCathy@Cathy's Cupboard Calamity
What a gorgeous idea! I love tiered plates and I am definately going to make this!! Perfect!
ReplyDeleteLooking forward to enjoying more of your blog!
Jen xo
goodness that is such a great idea! i am a new follower!
ReplyDeleteI LOVE this idea! Super cute! I got here via TDC and glad I found you ;) Looking forward to reading more!
ReplyDeleteCheryl
I've seen this done with mismatched vintage china to create a lovely teatime server. (using lamp making supplies for the hardware...silver or gold toned tubes to cover he thread bolt...and a finial on top to carry it with..)
ReplyDeletePlace your plate on a wooden block (or surface you don't mind drilling in to), and drill a hole in your plate at the spot you marked. homechoice comforters , cotton double bedsheet online shopping ,
ReplyDeletevv
ReplyDelete