


I have been facing a dilemma since we moved into our house. We have 6 windows in our living room, which I love! The amount of natural light is great. I'm fairly addicted to natural light. I cannot stand a dark house. Who cares if my energy bill would be a little less each month if I closed my blinds? I NEED LIGHT!
Back to my dilemma. The window walls are so long that it would cost a fortune to install drapery rods. Each wall is 10+ feet long. That = major money for drapery rods! I had to get creative....
Also, our windows meet in a corner, so that makes it more complicated. See the picture below.


I saw a show on HGTV that used PVC pipe for drapery rods in a room with a really long wall. That is what I would do!
Here is the price break down on PVC pipe versus regular curtain rods.
This price is what it would cost me to do 20+ feet of wall space.
1 3/8" Drapery Rods = $77.94 (from Lowes)
1 3/8" Drapery Rods = $150.00 (Bed Bath and Beyond)
1 3/8" Drapery Rods = $159.98 (Amazon.com)
or 1 1/4" PVC Pipe = $9.09
This price is what it would cost me to do 20+ feet of wall space.
1 3/8" Drapery Rods = $77.94 (from Lowes)
1 3/8" Drapery Rods = $150.00 (Bed Bath and Beyond)
1 3/8" Drapery Rods = $159.98 (Amazon.com)
or 1 1/4" PVC Pipe = $9.09
Holy Money Saver! So, PVC Pipe it was.
I went ahead and bought wood finials, brackets, and sconces to go with the PVC Pipe. I am in love with them. Wait....can you love something that won't love you back??
 I then found some spray paint that would match the finials/sconces. I gave the PVC pipe a few coats of Valspar Velvet Brown.
 I realized that the PVC looked too 'matte' after the spray paint, so I also did a few coats of a clear Gloss. Can you see the difference?
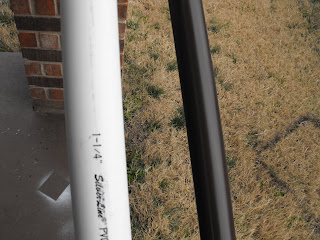 Wow. They are looking pretty niiiice. Would you guess they were PVC pipe?
 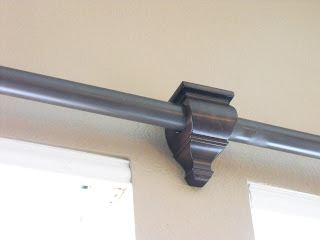 Now, the installation. What a pain. It wasn't hard, just took a while. First I installed the brackets and sconces.
 I then CAREFULLY slid in the PVC pipe. Your pvc pipe WILL scratch if you aren't careful. I did a few 'touch ups' on mine after installing it. See my scratch??
  I then slid on my curtains....... I want to take a break from my 'PVC' post and talk about the curtains. I am in LOVE with the fabric!
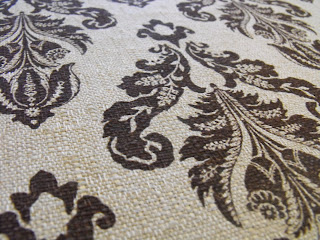
 I looked everywhere for drapes, and couldn't find anything even close to what I wanted. So, I broke down and decided to make them myself. How to actually make them will be another post entirely. I did make them (it took 2 weeks!!!) and I think they turned out pretty sweet. I used a chocolate and cream damask, with a wide chocolate band at the bottom, and some cording in between the two fabrics.
  What I love the most about this fabric is the 'burlap' look them have. It makes the fabric way less formal looking.
  Now, back to our reguarly scheduled post..... I hot glued the finials onto the end.
 Here are some finished shots. I think it looks pretty fab!


I went ahead and bought wood finials, brackets, and sconces to go with the PVC Pipe. I am in love with them. Wait....can you love something that won't love you back??

 I then found some spray paint that would match the finials/sconces. I gave the PVC pipe a few coats of Valspar Velvet Brown.
 I realized that the PVC looked too 'matte' after the spray paint, so I also did a few coats of a clear Gloss. Can you see the difference?
 Wow. They are looking pretty niiiice. Would you guess they were PVC pipe?
  Now, the installation. What a pain. It wasn't hard, just took a while. First I installed the brackets and sconces.
 I then CAREFULLY slid in the PVC pipe. Your pvc pipe WILL scratch if you aren't careful. I did a few 'touch ups' on mine after installing it. See my scratch??
  I then slid on my curtains....... I want to take a break from my 'PVC' post and talk about the curtains. I am in LOVE with the fabric!
 I looked everywhere for drapes, and couldn't find anything even close to what I wanted. So, I broke down and decided to make them myself. How to actually make them will be another post entirely. I did make them (it took 2 weeks!!!) and I think they turned out pretty sweet. I used a chocolate and cream damask, with a wide chocolate band at the bottom, and some cording in between the two fabrics.
  What I love the most about this fabric is the 'burlap' look them have. It makes the fabric way less formal looking.
  Now, back to our reguarly scheduled post..... I hot glued the finials onto the end.
 Here are some finished shots. I think it looks pretty fab!
Just to recap:
BEFORE (like, before we moved in....)
AFTER


