Monday, April 29, 2013

{Mint & Coral} Baby Shower

Pin It


Recently, I was able to host a baby shower for my friend, Emily! 


We went with mint and coral as the shower colors.  
It was a fun afternoon!


We had lots of yummy food......

Like a Chicken Caesar Salad bar.  DELICIOUS.


 A little fresh fruit.....


loving these little wax cups.  adorable.


Drinks....


A don't forget dessert!

Strawberry Shortcake kabobs.  Best idea ever!


Cake Pops
  Tips and Tricks found here!


Some more shots.  I'm hungry now!


We ended our fun get together with bird's nest party favors.
full tutorial coming soon!


It was so nice to celebrate Emily and her little girl coming soon!


Wednesday, April 24, 2013

Girls Room {Tour}

Pin It
We moved into our new place a few months ago, and first up on our list was getting our girl's room done!

Have you ever had a vague idea of how you wanted your space to turn out, but no clue how to do it?  That was me!!

I turned to Casey Grace Design for help on this space.

(btw, they are not paying me to blog about any of this.  they are an awesome design team, and I want you to know about them!)


The process was SO simple.  I filled out an online questionnaire about my tastes, and what I wanted/didn't want in the room.  I was able to set a budget.

After just a few short e-mails back and forth, I was sent an awesome Style Board, with pictures of the furniture & accessories, and a source list of where I could find it all.


IT. WAS. SO. WORTH. IT.


The Girl's Room turned out so cute
 Way better than if I had tried to do it myself!


So, here's the room.  Enjoy!


I love the girls beds.  They are so feminine and girly!


A close up of Miss J's peace sign pillow.  Her major request in her new room was to have peace signs!


Here is the reading nook.  I adore this chair.


It's a great place to snuggle up with Miss J and read a book.


Miss J has been begging me for a while for "flags" to put on her wall, so she was excited about this bunting!


The bunting adds fun pattern to the room!


The drapery is fun too.  I love the ruffles and dots.


Just because I know I will get asked, the stripe wall was done by me and the hubby!  It wasn't that hard to do, honestly.  It makes a big impact in the room!


Hope you enjoyed the tour :)


Oh, and just because she is so cute, here is little Miss E.  Snuggled up on her bed!


Friday, April 19, 2013

Chevron {Spring} Wreath Tutorial

Pin It
Can you tell I'm on a chevron kick right now?  I just finished this chevron vase for my Master Bedroom.


Now, it's time to show you how to dress up your front door for spring!


 Supplies

Wreath (I got an 18" one)
1/2 yard Chevron Fabric (I found mine at Hobby Lobby)
 Straight pins
Corsage Pins
Felt (I used 1/3 yard)
Scissors


Directions

Cut your fabric into strips.  I cut mine 3 inches wide X the width of the fabric.  I used 9 strips.


I got duck cloth, because I love the rough, linen-y texture.


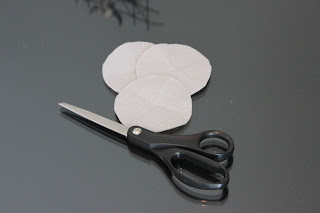
Next, let's cut out all the felt circles you will need.  I cut out about 50-60 3 inch circles.  Use a cup to trace around.


Time to assemble the wreath! Use a straight pin to pin your first piece of cloth to your blank wreath.


Keep wrapping your fabric around your wreath until the whole thing is covered!


Next up, let's make that gorgeous, ruffly felt stuff on the side.  
It's easier than it looks!


Start with one felt circle, and fold it in half.


Fold that circle in half again.


Your "petal" will look like this from the top:


Take the same straight pins you used when pinning on your fabric, and put one through the bottom of your petal, like this:


Pin it to your wreath.  Repeat this for ALL the circles.  
There is no set way of how close or far apart to put your "petals". 
 I pinned mine fairly close together to get more of a ruffly look.


Now, to dress it up a little, and to break up all that felt going on, randomly stick in some corsage pins.  I got the kind with a big pearl on top.  I like it fancy!


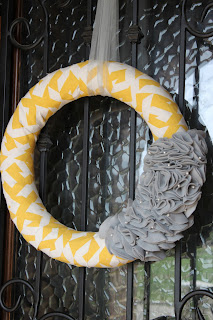
Your wreath should be looking like this:


LOVE IT!


Monday, April 15, 2013

{Gift Wrap} Organization: IKEA Style

Pin It
I saw this idea on pinterest last year, and could not WAIT to do it in my own house.  Pure Genius!


The supplies you need are simple.  
A quick trip to IKEA, and you are good to go!


Supplies
All from IKEA

Bygel bar (2)
Bygel Basket (1)
Bygel hooks
Riktig clips
Hanging cups


How to

Install the bars.

Bang up your basket, and use it to hold scissors, tape, cards.
Use the hanging cups to hold pens.


Use the Riktig clips to hold up your wrapping paper.


Use the Bygel hooks to hang gift bags.


DONE!


Loving this little organized space!