Wednesday, March 23, 2011

Make your own {Milk Glass}

Pin It
Milk Glass is so pretty!

Stephanie featured a DIY milk glass project a while ago, and I tucked it away in my files as a possible future project.


BEFORE

...plain glass vase from clearance aisle at Hobby Lobby.  Great shape, but boring!


AFTER

...all it took was a little acrylic paint and some water.....


Milk Glass How To:

I found that mixing a little acrylic paint in a cup with a tiiiiny bit of water to thin it out was a good way to go.


Pour that paint/water combo right into your glass vase
(I found that straight acrylic paint was too thick, and too forEVER to cover)


Gently roll the paint around your vase, covering all sides


After you have thoroughly "painted" the inside of your vase, turn it upside for about 30 minutes.


When you lift up your glass vase, you will get a flood of paint; that's ok!  Just wipe off the rim of your glass, and turn it upright to dry overnight.


Now, you're ready to put in pretty flowers, or just leave it plain and painted!
(I can't wait to try this technique with some fun colors.....)


Love the "inside painted" look:


This is how my vases look now:


Tuesday, March 15, 2011

SPRING {Mantle}

Pin It
My  mantle has been looking very sad for.....well, a long time.

I don't know why, but I'm kind of unmotivated to do anything with it. 

I finally got sick of how it was looking, and gave it a spring-y overhaul!

Here's the final result:


I'm loooooving my two new vases that I *made* myself!


I'm not a big faux-liage kind of person, so I tried to go with stuff that looked kind of realistic.  

I'm liking this little bunch of stuff:

Want to know how to MAKE your own milk glass vase?  Stay tuned!


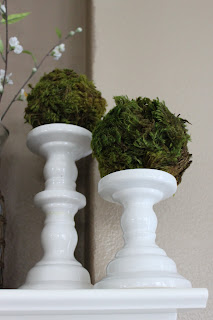
I made these cute little "moss balls" and put them on my white candlesticks I already had.

I went with really earthy looking moss.


I also made this little sign; it was a different color and said something else.  
I re-purposed it!


Overall, I'm liking all the white and brightness it brings into my brown living room!


Linking up here!

ps-I was totally inspired by Layla's mantle....check it out here!

Friday, March 4, 2011

Big Boy Room {Finished!}

Pin It
I LOVE the feeling of finishing a project.  Especially a big project!  

I showed you here how the Board & Batten turned out in Mr. A's room.


I showed you here all the tips and tricks I could think of for tackling B&B yourself!


So, do you want to see his FINISHED room?!


Lots of pictures to follow, and a list of where I found all his stuff at the bottom of the post.


Storage System

I was SHOCKED by how much stuff this system can hold!  It handles all the toys from my living room, all of Mr. A's books, and MUCH more.


The best part?  The chalkboard doors.  Mr. A looooooves them!


He also loves his little chalk pail:


I showed you in this post how I used vinyl to number his bins.  
I really like the way they look!


Bed

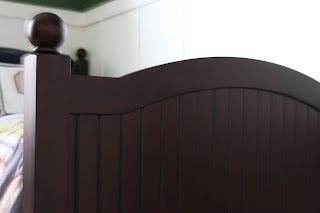
I love his bed!  We also sprung for the guard rail that matches it.....it looks so much nicer than the ghetto metal one I had on Miss J's bed!

Close up of the details:

Nice and boyish, right?


Bedding

Mr. A is, of his own choosing, all about basketball. 

I wanted to do a sports theme in his room without it screaming SPORTS!!


This quilt is a great weight.  Not too heavy, and it feels really well made.  He loves all the balls on it.


Above the Bed

Mr. A's only request for the whole room was a "hoop".  

So, I found him a pretty darn cute one! 

(it has chalkboard score boxes on both sides....love it!)
I customized it with his name and my trusty Cricut.  Wish I could show you the whole name; it's so cute!  

(you'll just have to wonder what Mr. A's real identity is.....)


His favorite past time is standing on his bed and shooting hoops :)


Extra Storage

If the storage wall wasn't enough, I found this FAB ball bin for Mr. A's bigger balls and stuff.

It's super tall, which is a plus.  Also, it breaks up all the wood in the room.  I like the metal.


Hubby's input

  Of course my hubby had input in our only son's room.  

He found this big vinyl decal and insisted that I find I place for it.  I was NOT sold on it at first, but I really like it now!


Close up:


Finishing Touches
My biggest hold up in the room was what do on the looong wall above the bed.  

I didn't want something giant up there, and we already had vinyl up on the wall that faced the bed.  Hmmmmm.

Where else would I find what I need than at Costco! (love that store)

They were running a special on their photo canvas.  $10 off each canvas; that is a deal!

I decided to do 3 canvases, and it took up the whole wall:


This is my favorite of the pictures:


I think that's it.  Hope you enjoyed the "tour"!


Where I found Mr.A's stuff

Storage Wall System - Pottery Barn Kids
Bed & Bedding - Pottery Barn Kids
Tall Wire Ball Bin - Land of Nod
Oversized Basketball Player vinyl decal - Empire City Studios (etsy)
Black & White Photo Canvas - Costco
Numbered Storage Bins: Lowes (customized by me)
Basketball hoop: Pottery Barn Kids (customized by me)
Galvanized Chalk Pail - Target (dollar bins)

TIP: The pieces I bought at PBK were ALL on sale.  January is their "storage sale" month (only ONCE a year), and they really mark down alot of their furniture.  I would recommend buying their storage system in January, when it's on sale.
The bed and bedding were also on sale too....sale prices beat full price!

Wednesday, March 2, 2011

Print your own {Lunch Bags}

Pin It
Sorry for the lack of posts my dear readers!  

I've had a lot of THIS going on at my house:

And by this, I mean potty training Mr. A.  
The good news?  He has been accident free for two days!  

Woohoo!  For all those (and that is pretty much everyone I know) who told me boys were harder to potty train than girls, you are wrong!  Mr. A was a million times easier to potty train than Miss J. 

disclaimer: I'm sure this is just my experience....everyone has told me that boys ARE harder than girls to potty train :)

Since I'm not posting about potty training, on with my latest DIY.


Miss J was assigned to bring snack to her preschool class.  There are 13 kiddos in her class, and she and I both wanted to make it fun.

Following this tutorial on how to print lunch bags on your computer, I designed my own bags in photoshop, and printed them right here on my home computer.

Here they are right off the printer:

I will have a FREE DOWNLOAD of my snack time bags below!

Close Up:


We filled them with yummy treats like muffins, fruit snacks and raisins:


I found the cute pencil tag over at Paper Glitter.  This is one of her free downloads!


Here's our cute snack bags, loaded with goodies:


Ready to be enjoyed by Miss J and her class!


Click Here for my snack time lunch bag printable!

Click Here for a great tutorial on how to print lunch bags on your home printer.